PostgreSQL データ ソースの追加
現在、Reveal SDK は、Reveal SDK core パッケージからデータ ソースを分離する過程にあります。プロジェクトの継続的な機能を確保するために、プロジェクトに追加のパッケージをインストールすることが必要になる場合があります。詳細については、サポートされるデータ ソース トピックを参照してください。
クライアント側
手順 1 - RevealView.onDataSourcesRequested イベントのイベント ハンドラーを追加します。
var revealView = new $.ig.RevealView("#revealView");
revealView.onDataSourcesRequested = (callback) => {
    //add code here
    callback(new $.ig.RevealDataSources([], [], false));
};
手順 2 - RevealView.onDataSourcesRequested イベント ハンドラーで、RVPostgresDataSource オブジェクトの新しいインスタンスを作成します。Host、Database、Port、および Title プロパティを、PostgreSQL サーバーに対応する値に設定します。RVPostgresDataSource オブジェクトを作成したら、それをデータ ソース コレクションに追加します。
revealView.onDataSourcesRequested = (callback) => {
    var postgresDataSource = new $.ig.RVPostgresDataSource();
    postgresDataSource.host = "your-db-host";
    postgresDataSource.database = "your-db-name";
    postgresDataSource.port = 1234;
    postgresDataSource.title = "My PostgreSQL";

    callback(new $.ig.RevealDataSources([postgresDataSource], [], false));
};
アプリケーションが実行されたら、新しい可視化を作成すると、新しく作成された PostgreSQL データ ソースが [データ ソースの選択] ダイアログに表示されます。

手順 3 - RVPostgresDataSourceItem オブジェクトの新しいインスタンスを作成して、新しいデータ ソース項目を追加します。データベース テーブルに対応する Id、Title、および Table プロパティを設定します。RVPostgresDataSourceItem オブジェクトを作成したら、それをデータ ソース項目コレクションに追加します。
revealView.onDataSourcesRequested = (callback) => {
    var postgresDataSource = new $.ig.RVPostgresDataSource();
    postgresDataSource.host = "your-db-host";
    postgresDataSource.database = "your-db-name";
    postgresDataSource.port = 1234;
    postgresDataSource.title = "My PostgreSQL";

    var postgresDsi = new $.ig.RVPostgresDataSourceItem(postgresDataSource);
    postgresDsi.id = "MyPostgresDataSourceItem";
    postgresDsi.title = "My PostgreSQL Item";
    postgresDsi.table = "TableName";

    callback(new $.ig.RevealDataSources([postgresDataSource], [postgresDsi], false));
};
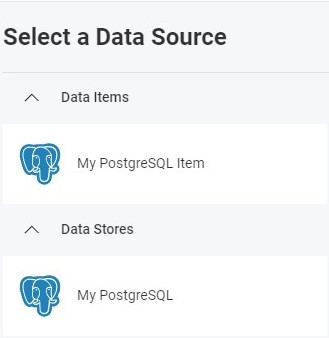
アプリケーションが実行されたら、新しい可視化を作成すると、新しく作成された PostgreSQL データ ソース項目が [データ ソースの選択] ダイアログに表示されます。
サーバー側
手順 1 - クライアントでデータ ソースとデータ ソース項目を作成しますが、接続情報は指定しません。id、title、および/または subtitle のみを入力してください。
var revealView = new $.ig.RevealView("#revealView");
revealView.onDataSourcesRequested = (callback) => {

    var postgresDataSource = new $.ig.RVPostgresDataSource();
    postgresDataSource.id = "MyPostgresDataSource";
    postgresDataSource.title = "My PostgreSQL";

    var postgresDsi = new $.ig.RVPostgresDataSourceItem(postgresDataSource);
    postgresDsi.id = "MyPostgresDataSourceItem";
    postgresDsi.title = "My PostgreSQL Item";

    callback(new $.ig.RevealDataSources([postgresDataSource], [postgresDsi], false));
};
手順 2 - データ ソース プロバイダーを作成します。この例では、クライアントで定義された PostgreSQL データベースに接続するための接続�情報を提供しています。これを実現するために、使用しているデータ ソース/項目のタイプを決定し、オブジェクトで使用可能なプロパティを設定します。
- ASP.NET
- Java
- Node.js
- Node.js - TS
public class DataSourceProvider : IRVDataSourceProvider
{
    public Task<RVDataSourceItem> ChangeDataSourceItemAsync(IRVUserContext userContext, string dashboardId,
        RVDataSourceItem dataSourceItem)
    {
        if (dataSourceItem is RVPostgresDataSourceItem postgresDataSourceItem)
        {
            //update underlying data source
            ChangeDataSourceAsync(userContext, postgresDataSourceItem.DataSource);

            //only change the table if we have selected our custom data source item
            if (postgresDataSourceItem.Id == "MyPostgresDataSourceItem")
            {
                postgresDataSourceItem.Table = "orders";
            }
        }

        return Task.FromResult(dataSourceItem);
    }

    public Task<RVDashboardDataSource> ChangeDataSourceAsync(IRVUserContext userContext,
        RVDashboardDataSource dataSource)
    {
        if (dataSource is RVPostgresDataSource postgresDataSource)
        {
            postgresDataSource.Host = "localhost";
            postgresDataSource.Database = "database";
            postgresDataSource.Schema = "public";
        }

        return Task.FromResult(dataSource);
    }
}
public class DataSourceProvider implements IRVDataSourceProvider {
    public RVDataSourceItem changeDataSourceItem(IRVUserContext userContext, String dashboardsID, RVDataSourceItem dataSourceItem) {

        if (dataSourceItem instanceof RVPostgresDataSourceItem postgresDataSourceItem) {

            //update underlying data source
            changeDataSource(userContext, dataSourceItem.getDataSource());

            //only change the table if we have selected our custom data source item
            if (dataSourceItem.getId() == "MyPostgresDataSourceItem") {
                postgresDataSourceItem.setTable("orders");
            }
        }
        return dataSourceItem;
    }

    public RVDashboardDataSource changeDataSource(IRVUserContext userContext, RVDashboardDataSource dataSource) {

        if (dataSource instanceof RVPostgresDataSource postgresDataSource) {
            postgresDataSource.setHost("localhost");
            postgresDataSource.setDatabase("database");
            postgresDataSource.setSchema("public");
        }
        return dataSource;
    }
}
const dataSourceItemProvider = async (userContext, dataSourceItem) => {
    if (dataSourceItem instanceof reveal.RVPostgresDataSourceItem) {

        //update underlying data source
        dataSourceProvider(userContext, dataSourceItem.dataSource);

        //only change the table if we have selected our data source item
        if (dataSourceItem.id === "MyPostgresDataSourceItem") {
            dataSourceItem.table = "orders";
        }
    }
    return dataSourceItem;
}

const dataSourceProvider = async (userContext, dataSource) => {
    if (dataSource instanceof reveal.RVPostgresDataSource) {
        dataSource.host = "localhost";
        dataSource.database = "database";
        dataSource.schema = "public";
    }
    return dataSource;
}
const dataSourceItemProvider = async (userContext: IRVUserContext | null, dataSourceItem: RVDataSourceItem) => {
    if (dataSourceItem instanceof RVPostgresDataSourceItem) {

        //update underlying data source
        dataSourceProvider(userContext, dataSourceItem.dataSource);

        //only change the table if we have selected our data source item
        if (dataSourceItem.id === "MyPostgresDataSourceItem") {
            dataSourceItem.table = "orders";
        }
    }
    return dataSourceItem;
}

const dataSourceProvider = async (userContext: IRVUserContext | null, dataSource: RVDashboardDataSource) => {
    if (dataSource instanceof RVPostgresDataSource) {
        dataSource.host = "localhost";
        dataSource.database = "database";
        dataSource.schema = "public";
    }
    return dataSource;
}
このサンプルのソース コードは GitHub にあります。