Custom Menu Items
The Reveal SDK supports adding Custom Menu Items, enabling users to modify the behavior of the contextual menu in dashboards and visualizations. The menu customization allows users to incorporate their own functionality into the menu by adding custom menu items and create sections by defining separators.
To manipulate the menu, you should first add an event handler for the revealView.onMenuOpening event on the client.
const revealView = new $.ig.RevealView("#revealView");

revealView.onMenuOpening = function (visualization, args) {
    ...
};
You can customize the behavior of menu items either dashboard-wide or visualization-wide by utilizing the menuLocation property. A value of Dashboard signifies that the menu is situated on the dashboard, whereas a value of Visualization indicates that the menu is specific to a visualization.
const revealView = new $.ig.RevealView("#revealView");

revealView.onMenuOpening = function (visualization, args) {
    //to modify menu behavior on dashboard
    if (args.menuLocation === $.ig.RVMenuLocation.Dashboard) {
       ...
    }

    // to modify menu behavior on visualizations
    if (args.menuLocation === $.ig.RVMenuLocation.Visualization) {
       ...
    }
};
Furthermore, you have the flexibility to customize the behavior based on additional properties, such as the title of the visualization.
const revealView = new $.ig.RevealView("#revealView");
revealView.onMenuOpening = function (visualization, args) {
//to modify menu behavior on dashboard
if (args.menuLocation === $.ig.RVMenuLocation.Dashboard) {
...
}
// to modify menu behavior on visualizations
if (args.menuLocation === $.ig.RVMenuLocation.Visualization) {
...
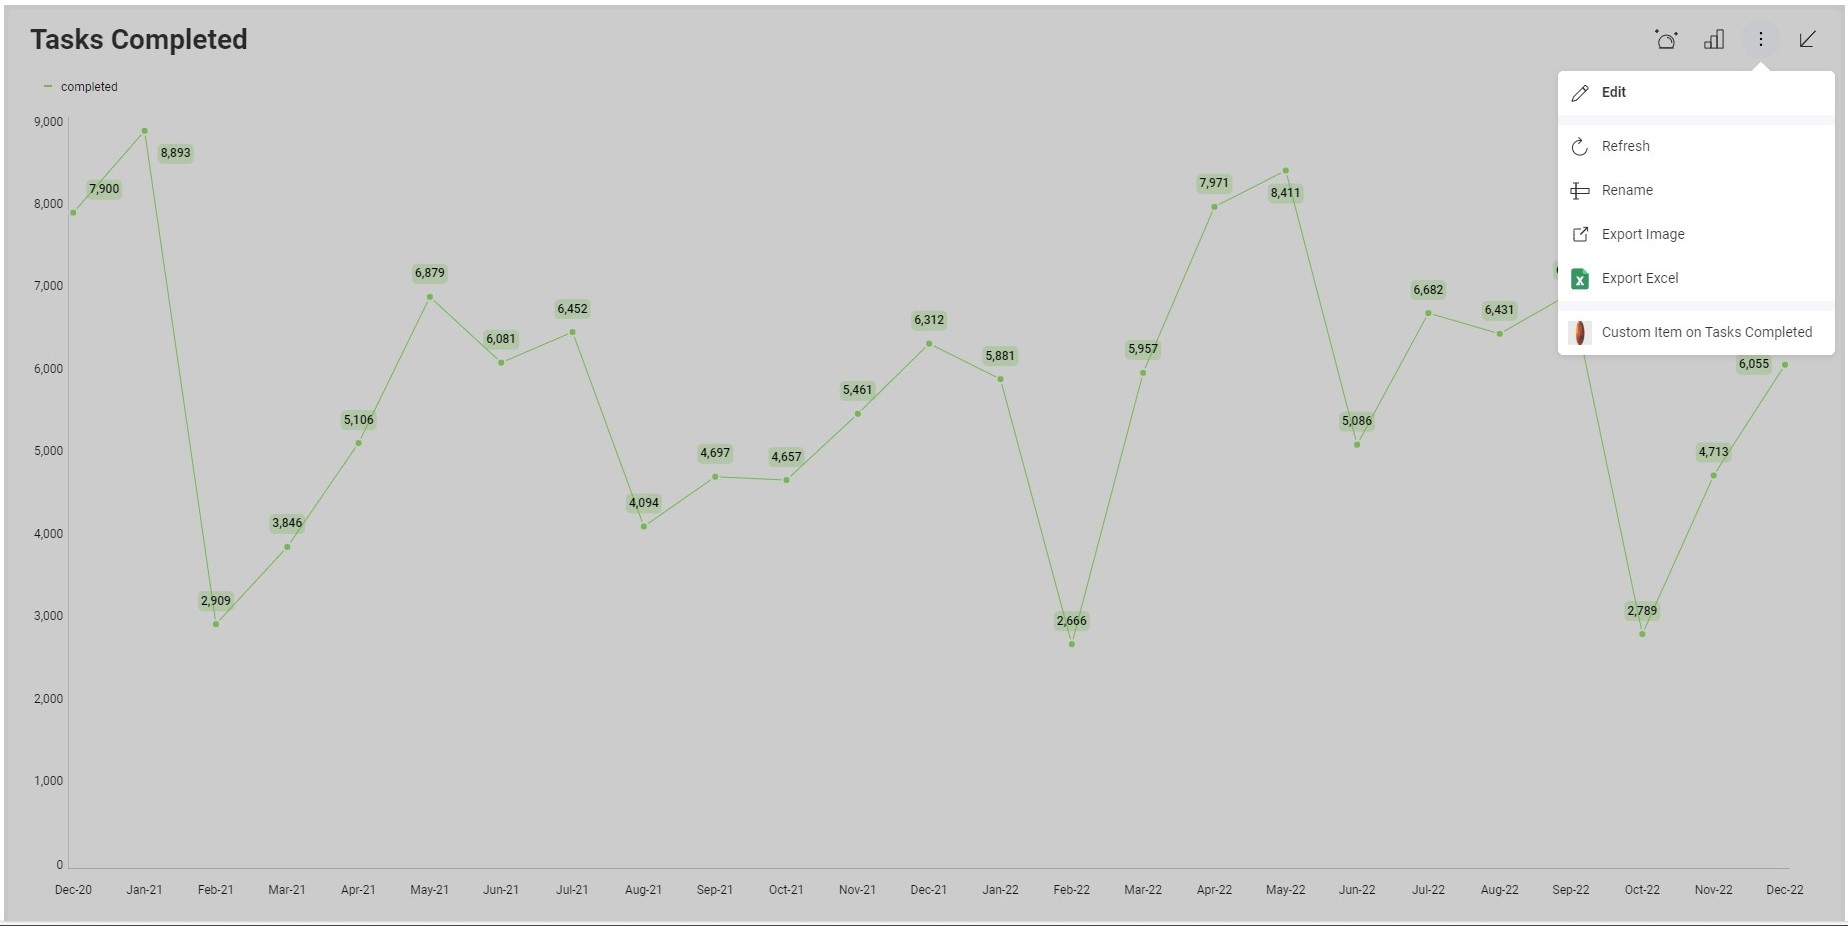
//adding a new menu item to the "Tasks completed" visualization
if(visualization.title === "Tasks Completed") {
...
}
}
};
Example: Creating a Custom Menu Item on a specific visualization
Step 1 - Add an event handler for the revealView.onMenuOpening event on the client.
Step 2 - Create a new instance of the class RVMenuItem and push it to the args.menuItems array. The callback specified in the RVMenuItem will be called when clicked.
$.ig.RevealSdkSettings.setBaseUrl("https://samples.revealbi.io/upmedia-backend/reveal-api/");

$.ig.RVDashboard.loadDashboard("Project Management").then(dashboard => {
    const revealView = new $.ig.RevealView("#revealView");
    revealView.dashboard = dashboard;

    revealView.onMenuOpening = function (visualization, args) {
        // to modify menu behavior on visualizations
        if (args.menuLocation === $.ig.RVMenuLocation.Visualization) {
            //adding a new menu item to the "Tasks completed" visualization
            if(visualization.title === "Tasks Completed") {
                const menuItem = new $.ig.RVMenuItem("Custom Item on Tasks Completed", new $.ig.RVImage("https://i.pinimg.com/736x/03/c8/a2/03c8a2aff8be6bee9064eef9b5d72d66.jpg", "Icon"), () => {
                    alert('my action');
                })
                args.menuItems.push(menuItem);
            }
        }
    };
});
Example: Creating a new section in the menu
Step 1 - Add an event handler for the revealView.onMenuOpening event on the client.
Step 2 - Add a separator in the menu by instantiating RVMenuSeparatorItem.
Step 3 - Create instances of RVMenuItem for the menu items to add to our new section.
$.ig.RevealSdkSettings.setBaseUrl("https://samples.revealbi.io/upmedia-backend/reveal-api/");

$.ig.RVDashboard.loadDashboard("Project Management").then(dashboard => {
    const revealView = new $.ig.RevealView("#revealView");
    revealView.dashboard = dashboard;

    revealView.onMenuOpening = function (visualization, args) {
        // to modify menu behavior on visualizations
        if (args.menuLocation === $.ig.RVMenuLocation.Visualization) {
            args.menuItems.push(new $.ig.RVMenuSeparatorItem());
            const menuItem1 = new $.ig.RVMenuItem("New section item 1", new $.ig.RVImage("https://i.pinimg.com/736x/03/c8/a2/03c8a2aff8be6bee9064eef9b5d72d66.jpg", "Icon"), () => {
                alert('action 1');
            })
            args.menuItems.push(menuItem1);
            const menuItem2 = new $.ig.RVMenuItem("New section item 2", new $.ig.RVImage("https://i.pinimg.com/736x/03/c8/a2/03c8a2aff8be6bee9064eef9b5d72d66.jpg", "Icon"), () => {
                alert('action 2');
            })
            args.menuItems.push(menuItem2);
        }
    };
});
Example: Hiding a predefined Menu Item
Step 1 - Add an event handler for the revealView.onMenuOpening event on the client.
Step 2 - In the args.menuItems array, locate the element you want to hide and set its isHidden property to true.
$.ig.RevealSdkSettings.setBaseUrl("https://samples.revealbi.io/upmedia-backend/reveal-api/");

$.ig.RVDashboard.loadDashboard("Project Management").then(dashboard => {
    const revealView = new $.ig.RevealView("#revealView");
    revealView.dashboard = dashboard;

    revealView.onMenuOpening = function (visualization, args) {
        //hiding a menu item
        for (let i = 0; i < args.menuItems.length; i++) {
            if(args.menuItems[i].title === "Export") args.menuItems[i].isHidden = true;
        }
    };
});
The source code to this sample can be found on GitHub