Saving Dashboards
The saving of a dashboard is invoked by the end-user interacting with the save buttons within the RevealView control in your application.
There are two types of save operations supported by the RevealView:
- Save - saves the current dashboard and overwrites the current .rdash file on disk
- Save As - saves the current dashboard as a new .rdash file on disk. Leaving the original .rdash file untouched.
The Save operation is invoked when the end-user is in edit mode, and clicks the Check Button in the top right corner of the RevealView.

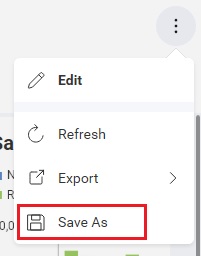
The Save As operation is invoked when the end-user opens the Kebab Menu located in the top right corner of the RevealView, and selects the Save As menu item.
Implementing Save
By default, the Reveal SDK provides a Save functionality if you are following the convention of placing your dashboards in the Dashboards folder on the server. However, if you are not storing your dashboards in a Dashboards folder on the server, and have created a custom IRVDashboardProvider, then you will need to implement your own custom save logic as well. We cover how to load dashboards from custom locations in the Loading Dashboards topic.
Start by modifying the existing IRVDashboardProvider class to implement the IRVDashboardProvider.SaveDashboardAsync method. In this example, we are saving the dashboard files into a folder named MyDashboards.
public class DashboardProvider : IRVDashboardProvider
{
    public Task<Dashboard> GetDashboardAsync(IRVUserContext userContext, string dashboardId)
    {
        var filePath = Path.Combine(Environment.CurrentDirectory, $"MyDashboards/{dashboardId}.rdash");
        var dashboard = new Dashboard(filePath);
        return Task.FromResult(dashboard);
    }

    public async Task SaveDashboardAsync(IRVUserContext userContext, string dashboardId, Dashboard dashboard)
    {
        var filePath = Path.Combine(Environment.CurrentDirectory, $"MyDashboards/{dashboardId}.rdash");
        await dashboard.SaveToFileAsync(filePath);
    }
}
Implementing Save As
The Reveal SDK provides the Save functionality by default. However, the Reveal SDK does not provide a Save As implementation, because it requires capturing the new file name for the dashboard from the end-user. This means that you as the developer will be required to write all necessary code to perform the Save As operation within the client application.
There are two ways to perform Save As in the Reveal SDK:
- Capture the new file name and then use an
IRVDashboardProviderimplementation to perform the save on the server - Capture the new file name and manually serialize the dashboard with custom save logic
If you decide to implement custom save logic, which means you manually serialize the dashboards and POST/PUT the result to your custom REST service endpoints, you must set the RevealView.serverSideSave property to false. This will instruct the Reveal SDK that all saving operations will be controlled by the client application and not use an IRVDashboardProvider impementation that may exist on the server.
revealView.serverSideSave = false;
In order to perform saving operations on the client, you must add an event handler to the RevealView.onSave event.
revealView.onSave = (rv, args) => {
    //handle save
};
The RevealView.onSave event provides two parameters; the RevealView, and the DashboardSaveEventArgs.
The DashboardSaveEventArgs object provides the following properties and methods to help you save dashboards:
- name - this is actually the Title of the current dashboard (the text displayed at the top of the dashboard in the
RevealView). It's important that the Name of the .rdash match the Title of the dashboard. - dashboardId - the ID of the dashboard being saved, for existing dashboards this is the ID used when loading it. For new dashboards or "save as" operation the value will be null. You should set the value of this property when "saving as" an existing dashboard or saving a new one before calling saveFinished, if not set it will be assumed to match the dashboard name.
- isNew - a flag indicating if this event was originated by saving a newly created dashboard, it will be false when saving or "saving as" an existing dashboard.
- saveAs - determines if this is a Save As operation
- serialize(bytes => ) - serializes the current dashboard to a
byte[]that can be used in custom save logic. Used with Save operations. - serializeWithNewName(name, bytes => ) - changes the
nameanddashboardIdand serializes the dashboard to abyte[]that can be used in custom save logic. Does not change the currently loaded dashboard'snameordashboardId. You must do this manually during the save operation. USed with Save As operations. - saveFinished() - REQUIRED - This method places the
RevealViewout of edit mode and into view mode indicating saving is complete.
Disabled Saving
You can prevent the end-user from invoking either the Save or Save As operations by either disabling editing or hiding the Save As UI elements.
To disable the Save operation, you must disable editing completely by setting the RevealView.canEdit property to false:
revealView.canEdit="false";
To disable the Save As operation, you must set the RevealView.canSaveAs property to false:
revealView.canSaveAs="false";
Example: Implementing Save with IRVDashboardProvider
In this example, we will implement both Save and Save As in the client application, but rely on the server's IRVDashboardProvider implementation to perform the actual save.
In the ASP.NET Core Web API server application, create a new class that implements the IRVDashboardProvider interface. Add the logic to load and save dashboards from your custom file directory in the GetDashboardAsync method. In this example, the ASP.NET Core Web API server application uses a folder named MyDashboards to store all dashboards.
public class DashboardProvider : IRVDashboardProvider
{
    public Task<Dashboard> GetDashboardAsync(IRVUserContext userContext, string dashboardId)
    {
        var filePath = Path.Combine(Environment.CurrentDirectory, $"MyDashboards/{dashboardId}.rdash");
        var dashboard = new Dashboard(filePath);
        return Task.FromResult(dashboard);
    }

    public async Task SaveDashboardAsync(IRVUserContext userContext, string dashboardId, Dashboard dashboard)
    {
        var filePath = Path.Combine(Environment.CurrentDirectory, $"MyDashboards/{dashboardId}.rdash");
        await dashboard.SaveToFileAsync(filePath);
    }
}
Update the AddReveal method in the Program.cs file to add the IRVDashboardProvider you just created to the RevealSetupBuilder using the RevealSetupBuilder.AddDashboardProvider method.
builder.Services.AddControllers().AddReveal( builder =>
{
    builder.AddDashboardProvider<DashboardProvider>();
});
Now, open the client application, add an event handler for the RevealView.onSave event, and determine if we are dealing with a Save or Save As operation by checking the DashboardSaveEventArgs.saveAs property.
revealView.onSave = (rv, args) => {
    if (args.saveAs) {

    }
    else {

    }
};
Let's start by first implementing the Save functionality. This can be done simply by calling DashboardSaveEventArgs.saveFinished. This will invoke the server side save code provided in the IRVDashboardProvider and exit edit mode.
revealView.onSave = (rv, args) => {
    if (args.saveAs) {
        //todo
    }
    else {
        args.saveFinished();
    }
};
Now, let's implement the Save As functionality. The first step in implementing Save As is to make sure we are dealing with a unique file name. Let's add a REST endpoint to our ASP.NET Core Web API server that will let the client application know if a dashboard name already exists. Open and modify the Program.cs file with the following code.
app.Map("/isduplicatename/{name}", (string name) =>
{
    var filePath = Path.Combine(Environment.CurrentDirectory, "MyDashboards");
    return File.Exists($"{filePath}/{name}.rdash");
});
We'll also want to add a function to our client application that we can call in order to use our new API.
function isDuplicateName(name) {
    return fetch(`https://localhost:7111/isduplicatename/${name}`).then(resp => resp.text());
}
Now, let's begin to implement the Save As operation. First, let's capture the new name from the end-user. Next, we want to check to see if the name the user provided is a duplicate. If there is a duplicate, we will prompt the user to override the existing file. If the end-user doesn't want to override the existing dashboard file, we want to cancel the saving process by invoking the return statement.
if (args.saveAs) {
    var newName = prompt("Please enter the dashboard name");
    isDuplicateName(newName).then(isDuplicate => {
        if (isDuplicate === "true") {
            if (!window.confirm("A dashboard with name: " + newName + " already exists. Do you want to override it?")) {
                return;
            }
        }

        //todo - perform save
    }
}
To complete the Save As operation, let's set the DashboardSaveEventArgs.dashboardId and DashboardSaveEventArgs.name to the new name of the dashboard. This will update the dashboard that is currently loaded into the RevealView to match the file being saved to the server. Next, we call the DashboardSaveEventArgs.saveFinished method which will invoke the server side save code provided in the IRVDashboardProvider and exit edit mode.
args.dashboardId = args.name = newName;
args.saveFinished();
}
The final code of the RevealView.onSave event looks like this:
revealView.onSave = (rv, args) => {
    if (args.saveAs) {
        var newName = prompt("Please enter the dashboard name");
        isDuplicateName(newName).then(isDuplicate => {
            if (isDuplicate === "true") {
                if (!window.confirm("A dashboard with name: " + newName + " already exists. Do you want to override it?")) {
                    return;
                }
            }

            args.dashboardId = args.name = newName;
            args.saveFinished();
        });

    }
    else {
        args.saveFinished();
    }
}
The source code to this sample can be found on GitHub
Example: Implementing Custom Save
In this example, we will implement both Save and Save As in the client application, but rely on a custom implementation to perform the actual save.
The first step to implementing custom save functionality is to set the revealView.serverSideSave to false. This tells the Reveal SDK that the client will be handling the save operations.
revealView.serverSideSave = false;
Next, add an event handler for save event and determine if we are dealing with a Save or Save As operation by checking the DashboardSaveEventArgs.saveAs property.
revealView.onSave = (rv, args) => {
    if (args.saveAs) {

    }
    else {

    }
};
Let's start by first implementing the Save functionality. First, we need to add a REST service end point to our ASP.NET Core Web API server application that will handle saving the dashboard to the server. Modify the Program.cs file and map a PUT route endpoint which will handle updating existing dashboard files.
In this sample code, we first check to make sure the file exists, if not we exit the method. If it does exist, we expect to get the dashboard byte[] from the Body of the request. We read the stream from the request.Body and convert it to a byte[] that can be used to overwrite the existing file and write the changes to disk.
app.MapPut("/dashboards/{name}", async (HttpRequest request, string name) =>
{
    var filePath = Path.Combine(Environment.CurrentDirectory, $"Dashboards/{name}.rdash");
    if (!File.Exists(filePath))
        return;

    byte[] bytes;
    using (var ms = new MemoryStream())
    {
        await request.Body.CopyToAsync(ms);
        bytes = ms.ToArray();
    }

    using (var stream = File.Open(filePath, FileMode.Open))
    {
        stream.Write(bytes, 0, bytes.Length);
    }
});
Next, let's add a function to our client application that will perform the save. This function will handle both the Save and Save As operations. This function will have parameters for the name of the dashboard, the byte[] which represents the dashboard contents, and isSaveAs which will determine whether or not this is a Save or Save As operation. If this is a Save As operation, we will set the method of the request to POST, which indicates a new file will be created.
function saveDashboard(name, bytes, isSaveAs = false) {

    let url = `https://localhost:7111/dashboards/${name}`;
    let params = {
        body: bytes,
        method: "PUT"
    }

    if (isSaveAs) {
        params.method = "POST"
    }

    return fetch(url, params);
}
Let's implement the Save logic in the RevealView.onSave event. First, we need to serialize the current dashboard to a byte[] by calling the DashboardSaveEventArgs.serialize method so we can send it to our REST service endpoint. In the callback of the DashboardSaveEventArgs.serialize method, we call the saveDashboard function we created earlier and pass the DashboardSaveEventArgs.name and the byte[] as arguments. When the saveDashboard completes, we call the DashboardSaveEventArgs.saveFinished method which will tell the Reveal SDK that saving has been completed and to place the RevealView out of edit-mode.
revealView.onSave = (rv, args) => {
    if (args.saveAs) {
        //todo
    }
    else {
        args.serialize(bytes => {
            this.saveDashboard(args.name, bytes).then(() => {
                args.saveFinished();
            });
        });
    }
};
Now, let's implement the Save As functionality. The first step in implementing Save As is to make sure we are dealing with a unique file name. Let's add a REST endpoint to our ASP.NET Core Web API server that will let the client application know if a dashboard name already exists. Open and modify the Program.cs file with the following code.
app.Map("/isduplicatename/{name}", (string name) =>
{
    var filePath = Path.Combine(Environment.CurrentDirectory, "Dashboards");
    return File.Exists($"{filePath}/{name}.rdash");
});
We'll also want to add a function to our client application that we can call in order to use our new API.
function isDuplicateName(name) {
    return fetch(`https://localhost:7111/isduplicatename/${name}`).then(resp => resp.text());
}
Now, let's begin to implement the Save As operation. First, let's capture the new name from the end-user. Next, we want to check to see if the name the user provided is a duplicate. If there is a duplicate, we will prompt the user to override the existing file. If the end-user doesn't want to override the existing dashboard file, we want to cancel the saving process. First, call the DashboardSaveEventArgs.saveFinished method to force the RevealView to exit edit-mode, and then return so that we exit the save event without performing any save operation.
if (args.saveAs) {
    var newName = prompt("Please enter the dashboard name");
    isDuplicateName(newName).then(isDuplicate => {
        if (isDuplicate === "true") {
            if (!window.confirm("A dashboard with name: " + newName + " already exists. Do you want to override it?")) {
                args.saveFinished();
                return;
            }
        }

        //todo - perform save
    });
}
To complete the Save As operation, we need to add another REST service endpoint to our ASP.NET Core Web API server to process the POST. Modify the Program.cs file and map a POST route endpoint which will handle saving new dashboard files.
In this sample code, we expect to get the dashboard byte[] from the Body of the request. We read the stream from the request.Body and convert it to a byte[] that can be used to create the new dashboard file.
app.MapPost("/dashboards/{name}", async (HttpRequest request, string name) =>
{
    var ms = new MemoryStream();
    await request.Body.CopyToAsync(ms);
    var bytes = ms.ToArray();

    var filePath = Path.Combine(Environment.CurrentDirectory, $"Dashboards/{name}.rdash");
    using (var stream = new FileStream(filePath, FileMode.Create, FileAccess.Write))
    {
        await stream.WriteAsync(bytes, 0, bytes.Length);
    }
});
Let's update our client code to complete the Save As operation. Before we perform the save, let's set the DashboardSaveEventArgs.dashboardId and DashboardSaveEventArgs.name to the new name of the dashboard. This will update the dashboard that is currently loaded into the RevealView to match the file being saved to the server. Now, we need to serialize the current dashboard to a byte[] by calling DashboardSaveEventArgs.serializeWithNewName. This method will serialize the dashboard to a byte[] using the new name which updates the title and id of the newly serialized dashboard. In the callback of the DashboardSaveEventArgs.serializeWithNewName method, we call the saveDashboard function we created earlier and pass the DashboardSaveEventArgs.name, the byte[], and true (to indicate save as) as arguments. When the saveDashboard completes, we call the DashboardSaveEventArgs.saveFinished method which will tell the Reveal SDK that saving has been completed and to place the RevealView out of edit-mode.
args.dashboardId = args.name = newName;
args.serializeWithNewName(newName, bytes => {
    this.saveDashboard(newName, bytes, true).then(() => {
        args.saveFinished();
    });
});
The final code of the RevealView.onSave event looks like this:
revealView.onSave = (rv, args) => {
    if (args.saveAs) {
        var newName = prompt("Please enter the dashboard name");
        isDuplicateName(newName).then(isDuplicate => {
            if (isDuplicate === "true") {
                if (!window.confirm("A dashboard with name: " + newName + " already exists. Do you want to override it?")) {
                    args.saveFinished();
                    return;
                }
            }

            args.dashboardId = args.name = newName;
            args.serializeWithNewName(newName, bytes => {
                this.saveDashboard(newName, bytes, true).then(() => {
                    args.saveFinished();
                });
            });
        });
    }
    else {
        args.serialize(bytes => {
            this.saveDashboard(args.name, bytes).then(() => {
                args.saveFinished();
            });
        });
    }
};
The source code to this sample can be found on GitHub