Databricks Data Source
Introduction
Databricks is a unified analytics platform that helps data engineering and data science teams collaborate on data processing, machine learning, and analytics at massive scale. This topic explains how to connect to Databricks data sources in your Reveal application to visualize and analyze your data.
Before configuring the Databricks data source in Reveal, you must install the appropriate database driver:
- For Windows/.NET: Databricks ODBC Driver
- For Node.js: Databricks ODBC Driver
- For Java: The JDBC driver is installed automatically via Maven.
These drivers are essential for establishing connections to your Databricks data source. After installation, ensure the drivers are properly configured according to Databricks documentation.
Server Configuration
Installation
- ASP.NET
- Node.js
- Java
Step 1 - Install the Reveal Databricks connector package
For ASP.NET applications, you need to install a separate NuGet package to enable Databricks support:
dotnet add package Reveal.Sdk.Data.Databricks
Step 2 - Register the Databricks data source in your application:
builder.Services.AddControllers().AddReveal( builder =>
{
    builder.DataSources.RegisterDatabricks();
});
For Node.js applications, the Databricks data source is already included in the main Reveal SDK package. No additional installation is required beyond the standard Reveal SDK setup.
For Java applications, the Databricks data source is already included in the main Reveal SDK package. No additional installation is required beyond the standard Reveal SDK setup.
The Databricks JDBC Driver supports Apache Arrow. When using a Java JVM version 11 or higher, add the line --add-opens java.base/java.nio=ALL-UNNAMED to the JVM arguments. Without this JVM argument, the driver will not work.
To set the JVM argument, add the following to your pom.xml file:
<plugin>
    <groupId>org.springframework.boot</groupId>
    <artifactId>spring-boot-maven-plugin</artifactId>
    <configuration>
        <jvmArguments>--add-opens java.base/java.nio=ALL-UNNAMED</jvmArguments>
    </configuration>
</plugin>
There are many ways to set this argument. This is just one example — for more, please see the relevant documentation.
Connection Configuration
- ASP.NET
- Node.js
- Node.js - TS
- Java
// Create a data source provider
public class DataSourceProvider : IRVDataSourceProvider
{
    public async Task<RVDataSourceItem> ChangeDataSourceItemAsync(IRVUserContext userContext, string dashboardId, RVDataSourceItem dataSourceItem)
    {
        // Required: Update the underlying data source
        await ChangeDataSourceAsync(userContext, dataSourceItem.DataSource);

        if (dataSourceItem is RVDatabricksDataSourceItem databricksItem)
        {
            // Configure specific item properties as needed
            if (databricksItem.Id == "databricks_sales_data")
            {
                databricksItem.Table = "sales_data";
            }
        }

        return dataSourceItem;
    }

    public Task<RVDashboardDataSource> ChangeDataSourceAsync(IRVUserContext userContext, RVDashboardDataSource dataSource)
    {
        if (dataSource is RVDatabricksDataSource databricksDS)
        {
            // Configure connection properties
            databricksDS.Host = "your-databricks-instance.cloud.databricks.com";
            databricksDS.HttpPath = "/sql/1.0/warehouses/abc123";
            databricksDS.Port = 443;
            databricksDS.Database = "default";
            databricksDS.Schema = "public";
        }

        return Task.FromResult(dataSource);
    }
}
// Create data source providers
const dataSourceItemProvider = async (userContext, dataSourceItem) => {
    // Required: Update the underlying data source
    await dataSourceProvider(userContext, dataSourceItem.dataSource);

    if (dataSourceItem instanceof reveal.RVDatabricksDataSourceItem) {
        // Configure specific item properties if needed
        if (dataSourceItem.id === "databricks_sales_data") {
            dataSourceItem.table = "sales_data";
        }
    }

    return dataSourceItem;
}

const dataSourceProvider = async (userContext, dataSource) => {
    if (dataSource instanceof reveal.RVDatabricksDataSource) {
        // Configure connection properties
        dataSource.host = "your-databricks-instance.cloud.databricks.com";
        dataSource.httpPath = "/sql/1.0/warehouses/abc123";
        dataSource.port = 443;
        dataSource.database = "default";
        dataSource.schema = "public";
    }

    return dataSource;
}
// Create data source providers
const dataSourceItemProvider = async (userContext: IRVUserContext | null, dataSourceItem: RVDataSourceItem) => {
    // Required: Update the underlying data source
    await dataSourceProvider(userContext, dataSourceItem.dataSource);

    if (dataSourceItem instanceof RVDatabricksDataSourceItem) {
        // Configure specific item properties if needed
        if (dataSourceItem.id === "databricks_sales_data") {
            dataSourceItem.table = "sales_data";
        }
    }

    return dataSourceItem;
}

const dataSourceProvider = async (userContext: IRVUserContext | null, dataSource: RVDashboardDataSource) => {
    if (dataSource instanceof RVDatabricksDataSource) {
        // Configure connection properties
        dataSource.host = "your-databricks-instance.cloud.databricks.com";
        dataSource.httpPath = "/sql/1.0/warehouses/abc123";
        dataSource.port = 443;
        dataSource.database = "default";
        dataSource.schema = "public";
    }

    return dataSource;
}
// Create a data source provider
public class DataSourceProvider implements IRVDataSourceProvider {

    public RVDataSourceItem changeDataSourceItem(IRVUserContext userContext, String dashboardId, RVDataSourceItem dataSourceItem) {
        // Required: Update the underlying data source
        changeDataSource(userContext, databricksItem.getDataSource());

        if (dataSourceItem instanceof RVDatabricksDataSourceItem databricksItem) {
            // Configure specific item properties if needed
            if ("databricks_sales_data".equals(databricksItem.getId())) {
                databricksItem.setTable("sales_data");
            }
        }

        return dataSourceItem;
    }

    public RVDashboardDataSource changeDataSource(IRVUserContext userContext, RVDashboardDataSource dataSource) {
        if (dataSource instanceof RVDatabricksDataSource databricksDS) {
            // Configure connection properties
            databricksDS.setHost("your-databricks-instance.cloud.databricks.com");
            databricksDS.setHttpPath("/sql/1.0/warehouses/abc123");
            databricksDS.setPort(443);
            databricksDS.setDatabase("default");
            databricksDS.setSchema("public");
        }

        return dataSource;
    }
}
Any changes made to the data source in the ChangeDataSourceAsync method are not carried over into the ChangeDataSourceItemAsync method. You must update the data source properties in both methods. We recommend calling the ChangeDataSourceAsync method within the ChangeDataSourceItemAsync method passing the data source item's underlying data source as the parameter as shown in the examples above.
Authentication
Authentication for Databricks is handled on the server side using a personal access tokens. For detailed information on authentication options, see the Authentication topic.
- ASP.NET
- Node.js
- Node.js - TS
- Java
public class AuthenticationProvider: IRVAuthenticationProvider
{
    public Task<IRVDataSourceCredential> ResolveCredentialsAsync(IRVUserContext userContext, RVDashboardDataSource dataSource)
    {
        IRVDataSourceCredential userCredential = null;
        if (dataSource is RVDatabricksDataSource)
        {
            // Use Personal Access Token
            userCredential = new RVBearerTokenDataSourceCredential("your_personal_access_token", "your_userid");
        }
        return Task.FromResult<IRVDataSourceCredential>(userCredential);
    }
}
const authenticationProvider = async (userContext, dataSource) => {
    if (dataSource instanceof reveal.RVDatabricksDataSource) {
        // Use Personal Access Token
        return new reveal.RVBearerTokenDataSourceCredential("your_personal_access_token", "your_userid");
    }
    return null;
}
const authenticationProvider = async (userContext: IRVUserContext | null, dataSource: RVDashboardDataSource) => {
    if (dataSource instanceof RVDatabricksDataSource) {
        // Use Personal Access Token
        return new RVBearerTokenDataSourceCredential("your_personal_access_token", "your_userid");
    }
    return null;
}
public class AuthenticationProvider implements IRVAuthenticationProvider {
    @Override
    public IRVDataSourceCredential resolveCredentials(IRVUserContext userContext, RVDashboardDataSource dataSource) {
        if (dataSource instanceof RVDatabricksDataSource) {
            // Use Personal Access Token
            return new RVBearerTokenDataSourceCredential("your_personal_access_token", "your_userid");
        }
        return null;
    }
}
Client-Side Implementation
On the client side, you only need to specify basic properties like ID, title, and subtitle for the data source. The actual connection configuration happens on the server.
Creating Data Sources
Step 1 - Add an event handler for the RevealView.onDataSourcesRequested event.
const revealView = new $.ig.RevealView("#revealView");
revealView.onDataSourcesRequested = (callback) => {
    // Add data source here
    callback(new $.ig.RevealDataSources([], [], false));
};
Step 2 - In the RevealView.onDataSourcesRequested event handler, create a new instance of the RVDatabricksDataSource object. Set the title and subtitle properties. After you have created the RVDatabricksDataSource object, add it to the data sources collection.
revealView.onDataSourcesRequested = (callback) => {
    const databricksDS = new $.ig.RVDatabricksDataSource();
    databricksDS.title = "Databricks";
    databricksDS.subtitle = "Data Source";

    callback(new $.ig.RevealDataSources([databricksDS], [], false));
};
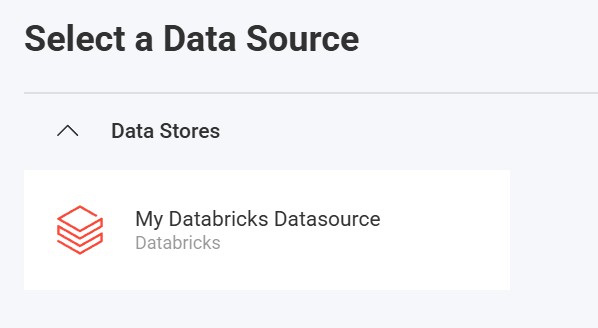
When the application runs, create a new Visualization and you will see the newly created Databricks data source listed in the "Select a Data Source" dialog.
Creating Data Source Items
Data source items represent specific datasets within your Databricks data source that users can select for visualization. On the client side, you only need to specify ID, title, and subtitle.
revealView.onDataSourcesRequested = (callback) => {
// Create the data source
const databricksDS = new $.ig.RVDatabricksDataSource();
databricksDS.title = "My Databricks Datasource";
databricksDS.subtitle = "Databricks";
// Create a data source item
const databricksDSI = new $.ig.RVDatabricksDataSourceItem(databricksDS);
databricksDSI.id = "databricks_sales_data";
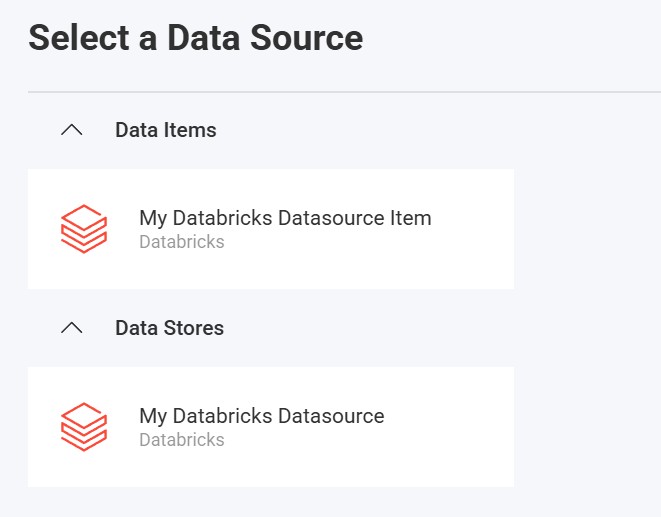
databricksDSI.title = "My Databricks Datasource Item";
databricksDSI.subtitle = "Databricks";
callback(new $.ig.RevealDataSources([databricksDS], [databricksDSI], false));
};
When the application runs, create a new Visualization and you will see the newly created Databricks data source item listed in the "Select a Data Source" dialog.
Additional Resources
- Databricks SQL Documentation
- Databricks ODBC Drivers
- Databricks JDBC Drivers
- Sample Source Code on GitHub
API Reference
- ASP.NET
- Node.js
- RVDatabricksDataSource - Represents a Databricks data source
- RVDatabricksDataSourceItem - Represents a Databricks data source item
- RVDatabricksDataSource - Represents a Databricks data source
- RVDatabricksDataSourceItem - Represents a Databricks data source item