DuckDB Data Source
Introduction
DuckDB is an in-process analytical database designed for fast local analytics. Reveal supports DuckDB database files as well as MotherDuck databases, so you can visualize and analyze embedded data sets, local files, and cloud-hosted DuckDB workloads from the same data-source type.
Server Configuration
Installation
- ASP.NET
- Node.js
- Node.js - TS
- Java
Step 1 - Install the Reveal DuckDB connector package.
For ASP.NET applications, you need to install a separate NuGet package to enable DuckDB support:
dotnet add package Reveal.Sdk.Data.DuckDB
Step 2 - Register the DuckDB data source in your application.
builder.Services.AddControllers().AddReveal( builder =>
{
    builder.DataSources.RegisterDuckDB();
});
For Node.js applications, the DuckDB data source is included in the main Reveal SDK package. No additional installation is required beyond the standard Reveal SDK setup.
For Node.js TypeScript applications, the DuckDB data source is included in the main Reveal SDK package. No additional installation is required beyond the standard Reveal SDK setup.
For Java applications, the DuckDB data source is included in the main Reveal SDK package. No additional installation is required beyond the standard Reveal SDK setup.
Connection Configuration
- ASP.NET
- Node.js
- Node.js - TS
- Java
// Create a data source provider
public class DataSourceProvider : IRVDataSourceProvider
{
    public async Task<RVDataSourceItem> ChangeDataSourceItemAsync(IRVUserContext userContext, string dashboardId, RVDataSourceItem dataSourceItem)
    {
        // Required: Update the underlying data source
        await ChangeDataSourceAsync(userContext, dataSourceItem.DataSource);

        if (dataSourceItem is RVDuckDBDataSourceItem duckDBItem)
        {
            // Configure specific item properties if needed
            if (duckDBItem.Id == "duckdb_orders")
            {
                duckDBItem.Table = "orders";
                duckDBItem.Schema = "main";

                // Optional: use a custom query instead of a table
                // duckDBItem.CustomQuery = "SELECT * FROM orders WHERE ship_country = 'USA'";

                // Optional: call a DuckDB table macro
                // duckDBItem.Procedure = "top_customers";
                // duckDBItem.ProcedureParameters = new Dictionary<string, object>
                // {
                //     ["min_total"] = 1000
                // };
            }
        }

        return dataSourceItem;
    }

    public Task<RVDashboardDataSource> ChangeDataSourceAsync(IRVUserContext userContext, RVDashboardDataSource dataSource)
    {
        if (dataSource is RVDuckDBDataSource duckDBDS)
        {
            // Configure connection properties
            duckDBDS.Database = "data\\northwind.duckdb";
            duckDBDS.Schema = "main";

            // For MotherDuck use:
            // duckDBDS.Database = "md:your_database_name";
        }

        return Task.FromResult(dataSource);
    }
}
// Create data source providers
const dataSourceItemProvider = async (userContext, dataSourceItem) => {
    // Required: Update the underlying data source
    await dataSourceProvider(userContext, dataSourceItem.dataSource);

    if (dataSourceItem instanceof reveal.RVDuckDBDataSourceItem) {
        // Configure specific item properties if needed
        if (dataSourceItem.id === "duckdb_orders") {
            dataSourceItem.table = "orders";
            dataSourceItem.schema = "main";

            // Optional: call a DuckDB table macro
            // dataSourceItem.procedure = "top_customers";
            // dataSourceItem.procedureParameters = {
            //     min_total: 1000
            // };
        }
    }

    return dataSourceItem;
}

const dataSourceProvider = async (userContext, dataSource) => {
    if (dataSource instanceof reveal.RVDuckDBDataSource) {
        // Configure connection properties
        dataSource.database = "data\\northwind.duckdb";
        dataSource.schema = "main";

        // For MotherDuck use:
        // dataSource.database = "md:your_database_name";
    }

    return dataSource;
}
// Create data source providers
const dataSourceItemProvider = async (userContext: IRVUserContext | null, dataSourceItem: RVDataSourceItem) => {
    // Required: Update the underlying data source
    await dataSourceProvider(userContext, dataSourceItem.dataSource);

    if (dataSourceItem instanceof RVDuckDBDataSourceItem) {
        // Configure specific item properties if needed
        if (dataSourceItem.id === "duckdb_orders") {
            dataSourceItem.table = "orders";
            dataSourceItem.schema = "main";

            // Optional: call a DuckDB table macro
            // dataSourceItem.procedure = "top_customers";
            // dataSourceItem.procedureParameters = {
            //     min_total: 1000
            // };
        }
    }

    return dataSourceItem;
}

const dataSourceProvider = async (userContext: IRVUserContext | null, dataSource: RVDashboardDataSource) => {
    if (dataSource instanceof RVDuckDBDataSource) {
        // Configure connection properties
        dataSource.database = "data\\northwind.duckdb";
        dataSource.schema = "main";

        // For MotherDuck use:
        // dataSource.database = "md:your_database_name";
    }

    return dataSource;
}
// Create a data source provider
public class DataSourceProvider implements IRVDataSourceProvider {
    public RVDataSourceItem changeDataSourceItem(IRVUserContext userContext, String dashboardId, RVDataSourceItem dataSourceItem) {
        // Required: Update the underlying data source
        changeDataSource(userContext, dataSourceItem.getDataSource());

        if (dataSourceItem instanceof RVDuckDBDataSourceItem duckDBItem) {
            // Configure specific item properties if needed
            if ("duckdb_orders".equals(duckDBItem.getId())) {
                duckDBItem.setTable("orders");
                duckDBItem.setSchema("main");

                // Optional: call a DuckDB table macro
                // duckDBItem.setProcedure("top_customers");
            }
        }

        return dataSourceItem;
    }

    public RVDashboardDataSource changeDataSource(IRVUserContext userContext, RVDashboardDataSource dataSource) {
        if (dataSource instanceof RVDuckDBDataSource duckDBDS) {
            // Configure connection properties
            duckDBDS.setDatabase("data\\northwind.duckdb");
            duckDBDS.setSchema("main");

            // For MotherDuck use:
            // duckDBDS.setDatabase("md:your_database_name");
        }

        return dataSource;
    }
}
Database accepts both absolute and relative DuckDB file paths. For ASP.NET, relative paths are resolved against AppContext.BaseDirectory. For MotherDuck, set the value to md:databaseName.
Schema is optional on both RVDuckDBDataSource and RVDuckDBDataSourceItem. If you do not set it, Reveal uses the default DuckDB schema, main.
DuckDB supports custom queries and DuckDB table macros on the server. For more information, see Custom Queries.
Any changes made to the data source in the ChangeDataSourceAsync method are not carried over into the ChangeDataSourceItemAsync method. You must update the data source properties in both methods. We recommend calling the ChangeDataSourceAsync method within the ChangeDataSourceItemAsync method passing the data source item's underlying data source as the parameter as shown in the examples above.
Authentication
Local DuckDB database files do not require authentication. When connecting to MotherDuck, provide a personal access token on the server through your authentication provider.
- ASP.NET
- Node.js
- Node.js - TS
- Java
public class AuthenticationProvider: IRVAuthenticationProvider
{
    public Task<IRVDataSourceCredential> ResolveCredentialsAsync(IRVUserContext userContext, RVDashboardDataSource dataSource)
    {
        IRVDataSourceCredential userCredential = null;
        if (dataSource is RVDuckDBDataSource duckDBDS && duckDBDS.Database?.StartsWith("md:") == true)
        {
            userCredential = new RVPersonalAccessTokenDataSourceCredential("your_motherduck_access_token");
        }
        return Task.FromResult<IRVDataSourceCredential>(userCredential);
    }
}
const authenticationProvider = async (userContext, dataSource) => {
    if (dataSource instanceof reveal.RVDuckDBDataSource && dataSource.database?.startsWith("md:")) {
        return new reveal.RVPersonalAccessTokenDataSourceCredential("your_motherduck_access_token");
    }
    return null;
}
const authenticationProvider = async (userContext: IRVUserContext | null, dataSource: RVDashboardDataSource) => {
    if (dataSource instanceof RVDuckDBDataSource && dataSource.database?.startsWith("md:")) {
        return new RVPersonalAccessTokenDataSourceCredential("your_motherduck_access_token");
    }
    return null;
}
public class AuthenticationProvider implements IRVAuthenticationProvider {
    @Override
    public IRVDataSourceCredential resolveCredentials(IRVUserContext userContext, RVDashboardDataSource dataSource) {
        if (dataSource instanceof RVDuckDBDataSource duckDBDS && duckDBDS.getDatabase() != null && duckDBDS.getDatabase().startsWith("md:")) {
            return new RVPersonalAccessTokenDataSourceCredential("your_motherduck_access_token");
        }
        return null;
    }
}
Client-Side Implementation
On the client side, you only need to specify basic properties like id, title, and subtitle for the data source. The actual DuckDB file path, MotherDuck database name, schema, and query configuration happen on the server.
Creating Data Sources
Step 1 - Add an event handler for the RevealView.onDataSourcesRequested event.
const revealView = new RevealView("#revealView");
revealView.onDataSourcesRequested = (callback) => {
    // Add data source here
    callback(new RevealDataSources([], [], false));
};
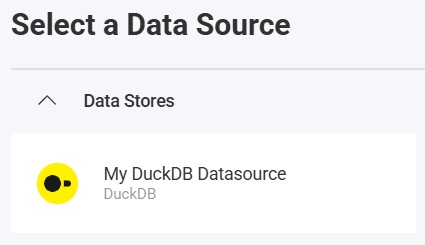
Step 2 - In the RevealView.onDataSourcesRequested event handler, create a new instance of the RVDuckDBDataSource object. Set the title and subtitle properties. After you have created the RVDuckDBDataSource object, add it to the data sources collection.
revealView.onDataSourcesRequested = (callback) => {
    const duckDBDS = new RVDuckDBDataSource();
    duckDBDS.id = "duckdb_ds";
    duckDBDS.title = "My DuckDB Datasource";
    duckDBDS.subtitle = "DuckDB";

    callback(new RevealDataSources([duckDBDS], [], false));
};
When the application runs, create a new Visualization and you will see the newly created DuckDB data source listed in the "Select a Data Source" dialog.
Creating Data Source Items
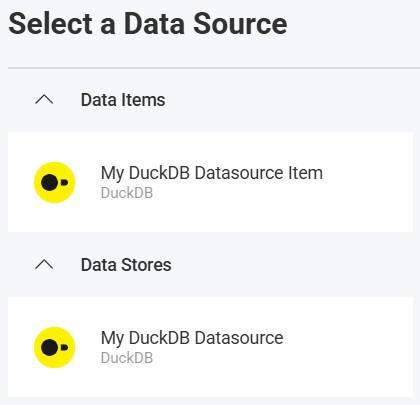
Data source items represent specific tables, views, or DuckDB table macros within your DuckDB data source that users can select for visualization. On the client side, you only need to specify ID, title, and subtitle.
revealView.onDataSourcesRequested = (callback) => {
    // Create the data source
    const duckDBDS = new RVDuckDBDataSource();
    duckDBDS.id = "duckdb_ds";
    duckDBDS.title = "My DuckDB Datasource";
    duckDBDS.subtitle = "DuckDB";

    // Create a data source item
    const duckDBDSI = new RVDuckDBDataSourceItem(duckDBDS);
    duckDBDSI.id = "duckdb_orders";
    duckDBDSI.title = "Orders";
    duckDBDSI.subtitle = "DuckDB";

    callback(new RevealDataSources([duckDBDS], [duckDBDSI], false));
};
When the application runs, create a new Visualization and you will see the newly created DuckDB data source item listed in the "Select a Data Source" dialog.
Additional Resources
API Reference
- ASP.NET
- Node.js
- RVDuckDBDataSource - Represents a DuckDB data source
- RVDuckDBDataSourceItem - Represents a DuckDB data source item
- RVDuckDBDataSource - Represents a DuckDB data source
- RVDuckDBDataSourceItem - Represents a DuckDB data source item